Category Archives: The Nation Has An Appetite

Pepper’s Summer Watermelon Cocktail

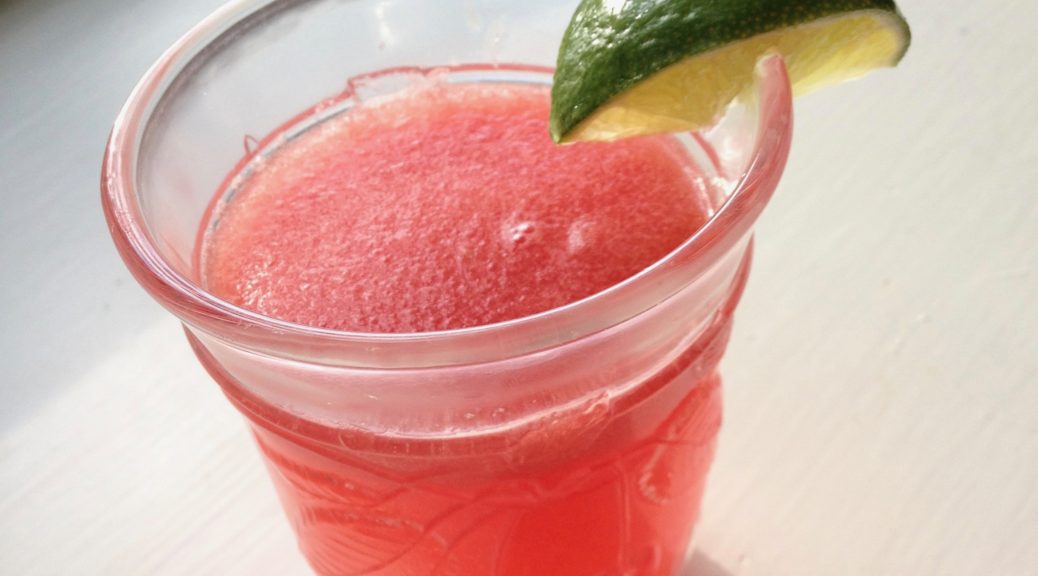
I've always been happy to leave the cocktail mixing to the pros, but while sheltering in place, I've been playing around. My younger son is really into watermelon these days, which made me wonder how watermelon might work in a cocktail. I came across this recipe, and after a little experimentation, I might just have found my favorite summer cocktail. It's not to sweet and has a spicy kick that I can't get enough of. Plus, the watermelon "ice cubes" are genius.

Planning note: you'll need to prepare the infused vodka, simple syrup, and watermelon ice cubes ahead of time. This might seem like more work than you want to do for an easy summer cocktail, but it's really not all that much. If you're making cocktails at home, you likely already have a jar of simple syrup in the fridge. And I've found that the extra watermelon juice is a great addition to fruit smoothies, which I've been making regularly for the boys.

INGREDIENTS

  • 2 oz. jalapeno-infused vodka
  • 1 small, seedless watermelon (or a package of cubed watermelon), from which you'll make juice and ice cubes
  • 1 lime, juiced to yield 1 tablespoon juice
  • 1 tablespoon simple syrup
  • splash of sparkling water or club soda
  • lime wedge for garnish (if desired)

DIRECTIONS

To make the jalapeno-infused vodka:
Measure your desired amount of vodka into a mason jar. (I've done this with 4 ounces and 8 ounces.) Slice 1 jalapeno pepper into rounds and add to mason jar. Put the lid on and let infuse for 30 minutes. (This gets quite spicy quickly, so you do NOT want to forget about it and let it sit for hours!) Strain out pepper and seeds and return vodka to mason jar. Store at room temperature until ready to use.

null

To make the cocktail:
Cut watermelon into cubes approx. 1.5 inches square. For each drink you plan to make, throw four cubes into a ziploc bag and freeze for 2 hours (or longer). These will be your ice cubes. Take about a cup of watermelon cubes and liquefy, using an immersion blender, full-size blender, or food processor. Note: I strained the juice the first time I made it, but I found that by not straining it, I get more watermelon flavor in the drink, which I prefer.

Measure 1/4 cup (2 oz.) watermelon juice, 1 tablespoon fresh lime juice, 1 tablespoon simple syrup, and 2 oz. jalapeno-infused vodka. If you have a cocktail shaker, shake it all up and strain into a glass over your watermelon ice cubes. If you're shaker-less like me, stir vigorously and then pour into a glass over your watermelon ice cubes. Add a splash of sparkling water (I probably use about 1 oz.). Garnish with a lime if desired. And enjoy!

The Nation Has An Appetite: The House Special

Though it's occasionally a chore, one silver lining to the whole pandemic situation is that we're basically cooking everything in house. We very occasionally get something from outside, but I think we do that on average maybe once every two weeks. While it's fun to try new things, or at least get creative with ingredients before they go bad, that's still a whole lot of cooking that needs to be done. This naturally means we've all got a few go-to's that we can pull out quickly, or at least easily.

Now, we've got a home with young, picky-ass kids, so our house specials are very boring and basic. Tacos, macaroni, various non-threatening noodle and pasta dishes, but that's pretty much as far as it goes. Japanese curry is about as exotic as it gets with them. Jane and I have been trying all sorts of stuff, but the same namby-pamby retreads are the only sure things around here (yeah, I'm bringing that phrase back).

What dishes are in top rotation in your homes when you need a quick and easy win?

Milk Crate Container Garden for the ‘pocalypse

After Doc S (I think) mentioned that we were going to run into shortages of produce as supply chains were stress out by the pandemic Dr. Chop and I got down to business planting vegetables and herbs. We try to grow stuff every year, and every year we lose most the crop to the insects. This year we were able to spend a lot more time in the yard and we were able to kill enough caterpillars to keep the peppers and squash alive. And now we've got peppers for days. We also installed a bird feeder which I think has a positive effect on the insect problem as well.

As I mentioned in the CoC we got an Aero Garden at the start of the year, and we've been able to produce several heads of lettuce, spinach, and herbs. Currently, we've got chives sprouting, a new head of spinach, and bok choi growing to be transferred to the containers. We've always grown food stuff in containers, including our citrus, fig and olive trees, because the soil in New Orleans is suspect to begin with and the flooding from Katrina didn't help matters. We've found through the tree services by Rich's Tree Service, Inc that you need to use high quality potting soil, compost, and an occasional fertilizing in order to get enough nutrient into the containers to provide good growth.

While out walking the neighborhood I found several milk crates littered in vacant lots, and the idea sprouted to turn them into square foot garden boxes. I had some stupid expensive dirt and ground cloth delivered for free (I heavily tipped the driver) from the local garden shop. I measured the crates - 12 x 12 x 10 3/4(h), so I cut the 48 inch long cloth into 14 inch wide strips with excess to account for seam allowance.

I laid two strips across each other at their centers and sewed 2 sides together. I decided that doubling the cloth on the bottom would slow drainage, and add an extra layer of protection from weeds and other intruders.


Then you gather up the corners and sew them face to face to make a box


Repeat for the remaining 3 corners and you've got a ground cloth box.

Instead of making these cloth boxes to match the actual size of the crate, I made them much taller so that I could wrap the excess over the top to keep the pressure of the dirt from spilling out of the bag.

As a side note, making sweet potatoes from a sprouting sweet potato is the easiest, and one of the most satisfying horticultural endeavors I've ever undertaken. I put the sprouted spud in a clear cup of water and let the roots grow out and alien looking purple leaves and veins multiplied quickly under the grow light of the aero garden. I was a little late getting these into the boxes for them to produce large potatoes, but they'll certainly make a bunch of tubers.

Worth-the-Extra-Effort Baked French Toast

Confession: I'm not great at making French toast on the stovetop. I don't know if it's that I'm not using the right bread, not using the right recipe, or don't have the right temperature for the griddle. But that's okay because I much prefer baked French toast anyway. You put in all the effort the night before, and then in the morning you just have to stumble out of bed, preheat the oven, and make yourself some kind of caffeinated beverage while the oven does the rest.

A while back I shared an easy baked French toast recipe. This is the one to break out when you are feeling extravagant. It makes a whole lot, which is great because the leftovers are also delicious. If you want to go all out, this spinach and potato breakfast hash is great alongside it.

INGREDIENTS
French Toast
1-2 tablespoons butter to grease pan
1 loaf crusty bread
8 large eggs
2 cups (16 oz) whole milk
1/2 cup (4 oz) heavy cream
1/2 cup (3.5 oz) granulated sugar
1/2 cup (4 oz) light brown sugar
2 tablespoons vanilla extract (yes, tablespoons is correct!)

Topping
1/2 cup (2 oz) flour
1/2 cup (4 oz) light brown sugar
1 teaspoon cinnamon
1/4 teaspoon salt
approx. 1/4 teaspoon freshly grated nutmeg
1 stick (4 oz.) butter, cut into pieces

TO PREPARE THE NIGHT BEFORE
Grease a 9 x 13 baking pan with butter. Cut the bread into cubes (1" square or smaller) and place in the pan. Crack the eggs into a large bowl. Add milk, cream, granulated sugar, brown sugar, and vanilla and whisk everything together. Then pour it all over the bread. Cover the pan tightly (I use plastic wrap) and store in the fridge overnight.

Make the topping: Mix the flour, brown sugar, cinnamon, salt, and nutmeg in a separate bowl Add the butter and use a pastry cutter to mix it all together until the mixture resembles fine pebbles. (Be careful at this stage; I once flung a large piece of butter out of the bowl and onto the kitchen floor while doing this.) Transfer mixture to a Ziploc bag and store in the fridge.

TO BAKE
Preheat the oven to 350 degrees F. Take the pan out of the fridge and sprinkle topping on evenly. Bake for 45-60 minutes. The shorter time gives you something that is very bread putting-esque in the middle, while the longer time gives a firmer, less squidgy texture.

Scoop individual servings onto plates and drizzle with syrup. (A little syrup goes a long way here.) I like to serve with some vegetarian sausage and fresh fruit.

Recipe source: The Pioneer Woman

Banana Cream Pie for bananas times

What to do with the just ripe to just over ripe bananas? Pie, of course. The hard way around is to make your own pie crust, but a store bought version will work out just fine. Bake the pie crust til golden brown, and set aside to cool. For the filling you'll need:

5 tbs flour
1/2 cup sugar
1/2 tsp salt
2 cups whole milk (very important it's whole milk...)
2 egg yolks
1/2 tsp vanilla
3-4 bananas

Method:
Scald the whole milk in the bottom of a double boiler. Essentially you want to bring the temp of the milk to 180 degrees F. While milk is warming on the stove combine the flour, sugar, and salt in the top half of the double boiler and whisk to combine. Stir the milk to keep a skin from forming, and once the milk is scalded add to the dry ingredients. Rinse out the bottom of the double boiler and fill with enough water to warm the upper half sufficiently. Once the liquid has warmed temper the eggs by adding a few tablespoons worth of milk mixture to the eggs at a time. This will keep the eggs from scrambling once they're added to the milk. Stir in the eggs and reduce the pudding you've made to as thick a consistency as you like - in this case thicker is better so that you don't have runny pudding pie, but it's really dealers choice - When you've just about reached your desired pudding texture stir in the vanilla, slice the bananas into the pie shell, and then fill pie shell with the pudding. Place the whole works in the fridge to chill for a couple of hours.

The Nation Has An Appetite: Garlic Shrimp in Coconut Milk

A few weeks ago, when I was planning for a long-term quarantine, I decided that at some point I'd make a red curry. But when I opened my fridge this past week I discovered that I didn't have enough curry paste and I needed to come up with a different plan. Glancing around the internet I found a few recipes that seemed like I could try for, but none for which I really had all the ingredients. And I wasn't going out for more. So here's what I came up with:

INGREDIENTS
Lots of jumbo shrimp. The bigger the better.
Olive oil
1 red bell pepper
1 green bell pepper
1 small onion
4 cloves garlic, minced
1 inch ginger, grated
Salt
Crushed red pepper flakes
1 can diced tomatoes, drained
1 can coconut milk
Juice of 1 lime
Basil (I used dried, since it was available)

Fry the garlic and ginger in hot oil, about 1 minute.
Slice the peppers and onion, add to the garlic, cook until soft - about 5 minutes.
Add the can of coconut milk* and tomatoes, salt, basil, 1/2 of lime juice, red pepper flakes, bring to a boil, then simmer for 10 minutes.
*I've seen it suggested that coconut milk should not be stirred up before adding it to the pan, and should be melted down and slowly mixed in as it cooks. That's what I did here and it worked really well, so it seems like that is true?
Add the shrimp, keep over heat until just cooked through.
Add the rest of the lime juice, and more red pepper flakes to taste.

I served over rice noodles and with a slice of toast (good toasted bread is perfect with this for soaking up the milk).

This definitely seemed like it could use some fresh herbs - One of the inspiring recipes called for cilantro. Maybe something with a little more crunch sprinkled over the top too, though I'm not sure what. Also, if anyone has suggestions for cooking process that would help improve this, I'd be happy to take those. I definitely plan on making this again - the shrimp came out perfect, the left-overs heated really well (no leftover shrimp... that should probably go without saying, right?), it came together really fast and easy, etc. So any improvements are appreciated!

Bootsy’s Hungover Kale

BOOTSY'S HUNGOVER KALE

I stumbled upon this "recipe" while trying to recreate/interpret a wonderful dish called Hungover Kale from Mucci’s Restaurant on W. Lake Street in Minneapolis. Theirs includes pancetta, pine nuts and Chardonnay. As I had none of the above items, I decided to wing it with ingredients that I had on hand. After all, that's half the fun of cooking, IMO. And while I won’t claim that my dish is tastier than the offering from Mucci (it isn’t), I can attest that it's pretty damn good in its own right (it is.) Serve it as a main course with an egg or two on top, or in combination with a side of buttered noodles, rice, or macaroni and gravy.*

*hat tip to Paulie Walnuts

Ingredients:

-6 cups kale chopped and washed

-1 medium to large yellow onion chopped

-6 cloves garlic chopped (more or less to your tastes)

-8oz ground pork sausage (could sub turkey sausage or skip entirely, but it becomes a different dish--still good, I bet)

-2  jalapeño peppers sliced (more or less depending on your tastes)

-3 tablespoons olive oil

-3 oz. dry vermouth (a good glug from the bottle.)

-1 can cannellini beans drained and rinsed

-1 teaspoon crushed red pepper (you could cut that in half if you lack fortitude)

-sea salt

-black pepper

-farm fresh eggs (optional)

-green onions (optional)

-quarter cup pine nuts or chopped walnuts (optional)

Now first an admission, I rarely ever follow a recipe. (It's why I don't bake. lol) In fact, I take a perverse pride in winging it in the kitchen. I once made dinner for a group of co-workers from the restaurant at the Hilton,  including the executive chef and his wife. Yes, I was nervous. Very nervous, as a matter of fact. Turns out,  I shouldn't have been--everybody loved it. (It was my Hot and Spicy Pork.) Afterwards, Chef J.G. asked if he might have the recipe. I told him there wasn't one, I just threw it together by feel. He smirked and said, "I wasn't aware that you played Jazz." With that in mind, these measurements are all approximations.

In a large skillet add 3 tablespoons olive oil and bring to medium heat. Add onion, jalapeños, and a couple pinches of sea salt. Cook until onions are semi-translucent. Add garlic and brown for a few minutes. Add ground pork sausage and raise heat to med high. Add the crushed red pepper and brown the sausage while gently mixing the contents with a spatula. Once the meat is cooked somewhat (med-rare-ish), raise heat to high and add the cannellini beans. After a minute or so, add 3 ounces of dry white vermouth (cooking sherry or the Chardonnay that the recipe actually calls for could be substituted.) Promptly add the chopped kale on top of ingredients and cover. After a minute or so on high, reduce heat all the way down to low. Check dish after 12-15 minutes and stir your mixture of ingredients all together. Re-cover the skillet and continue on low heat for 5 more minutes. The beauty of this recipe is that while it's ready to serve at this point, you can continue to keep the dish on low heat for another 15 minutes or more. Kale retains its integrity far longer than most greens, so it won't turn to mush. It affords you the time to tend to other items you might be preparing, or simply give you an opportunity to enjoy a glass of wine before dinner. First rule of the kitchen? Marinate the chef. Top with the pine nuts or walnuts if you have them. (I did not this outting.) Add additional salt and pepper to taste. Once plated, a sprinkling of sliced green onion will add even more color, flavor and texture thus assuring your dish is ready for its close-up, Mr. DeMille. Bootsy's Hungover Kale: a versatile and tasty dish that works for breakfast, lunch or dinner. Serves 3-4 as an entree, 6-8 as a side dish.

Super Crispy Chicken Wings

With the Super Bowl* right around the corner, I've got finger foods on my mind. As far as I'm concerned, there's no better snack for watching a football game than chicken wings. There's a whole national restaurant chain built around this idea, so I've got some company. A couple of weeks ago I came across a recipe for crispy wings that turned out to be pretty awesome. You start with the wings, of course, about 8 or 10 of them unless you expect company, then multiply the recipe as you see fit. I can easily eat half a dozen of these babies myself, so keep gluttony in mind when planning. I like to start by looking over my wings and making sure all the little feathers are gone. Take some kitchen shears and cut off the wingtips. You can throw them away, or if you were raised during the Great Depression you can boil them up with some onion and celery to make a small batch of stock. If you like, you can cut the remaining wings in half at the joint, but I don't bother, they pull apart nice and easy after cooking and cutting them can be a chore. Once prepped, you dredge your wings in a mixture of baking powder and salt. For a basic recipe, use 1 tablespoon of baking powder and 1/2 teaspoon of salt. You can get creative at this point and use seasoned salt or add some spices of your choosing. I used Cajun seasoned salt in mine, but let your taste buds be your guide. One important note. Some baking powder is made with sodium aluminum sulfate, and you want to avoid that at all costs as it give the wings a bitter flavor. We use the Rumford brand which is free of aluminum salts, so no worries. Mix your baking powder and seasonings in a bowl, then dredge your wings to give them a thin coating of the powder. Place the wings on a baking rack on a cookie sheet (cover your sheet with foil for easy clean-up) so the hot air will circulate around the meat and pop them into a 250 degree oven for about 30 minutes, then crank the heat up to 425 and cook for another 40 to 50 minutes. In phase one, the low temps combined with the baking powder dry out the skin and start the fat rendering. In phase two, the high temps crisp up the skin, seal in the juices and cook the meat to tender perfection. You will want to have a vent fan running during the high heat stage as the fat dripping onto the cookie sheet can generate a surprising amount of smoke, enough to set off a smoke alarm if you aren't venting (trust me on this). Once the wings come out and cool a bit, you can eat them as they are (that's my preference) or toss them in some barbecue or hot sauce of your choosing. I've tried several different ways of cooking wings over the years (grilled, deep fried, pan fried, pan baked, etc.) but this is now my favorite method and I'm going to stick with it until something better comes along. Enjoy.

*Yeah, that's right, NFL, I said Super Bowl, not the Big Game or some other such nonsense. You don't own language, you insufferable pricks.

The Nation Has An Appetite – On The Grill

First, let me disappoint you: I've no recipes or photos or any such to share. There, now that that's out of the way...

I spent a lot of time last night cleaning my grill. I've got a 3 burner gas grill that's about 8 years old. I've used it an absolute ton, but for the past 2.5 years it was in storage. And, apparently, it was put into storage without my having done a deep clean first (we were moving, and, if I remember correctly, it was one of those "well, we've got room for it in this truck, so it's going now, even if you're not ready for it" situations). I usually do a good clean at the start of the summer and another sometime in the fall, but grills are... well, they're tough.

I mostly used soap, water, and lots of elbow grease. Paper towels, sponges, some steel-wool type of thing designed for grills, and cloths all got used. It looks a heck of a lot better, and I'm excited to take it out for a test run this weekend. I need to get a propane tank filled first, so there's a part of me that's still nervous it won't light up, after having been packed away for so long. Let's hope!

Anyway, I thought this was as good a time as any to broach the grilling topic. Summer is upon us... what do you have, what do you wish you had, how do you manipulate what you do have to make it do what you want (I'm thinking about Meat's post (it was Meat, right?) where he converted the old Weber... that was cool)? And what tools do you use? What do you use for cleaning? (I've heard horror stories of bristles coming off and puncturing internal body parts when accidentally consumed... I don't know about the truth of these, but that's the kind of thing that might give you pause) What do you avoid? What other tools do you use for cooking on the grill (I've got a grill tray that I adore, and every time I make anything else I try to throw a bunch of veggies on the tray. Always steps up the meal a notch or two.)?

And, of course, if you've got an recipes or recommendations for grilling... by all means, please do share.

Bake Your Own Pretzels

I was just telling a friend the other day how much I like homemade baked pretzels, and I figured some of y'all might be interested in the recipe as well!

I've been making this recipe from Alton Brown for a few years now, and it has never disappointed.

Notes:
The directions call for using a stand mixer, but there's no reason these couldn't be mixed and kneaded by hand if you were so inclined.

Authentic baked pretzels are boiled in lye, but the baking soda/water mixture in this recipe works pretty darn well and involves a lot less in the way of safety precautions.

If you don't have pretzel salt, you can use coarse kosher salt, but the real thing is better. I couldn't find any pretzel salt in stores, so I ordered it online. The smallest size container I found was 2 pounds, so I expect I'll be making this recipe for many years to come...

Ingredients
1 1/2 cups warm water (110-115°F)
1 tablespoon granulated sugar
2 1/4 teaspoons active dry yeast (1 package)
1 lb, 6 oz all-purpose flour*
2 teaspoons kosher salt
2 ounces unsalted butter, melted
vegetable oil (I use spray canola oil)
10 cups water
2/3 cup baking soda
1 large egg yolk beaten with 1 tablespoon water
pretzel salt

Directions
Combine water and granulated sugar in the bowl of a stand mixer and sprinkle the yeast on top. Let sit for 5 minutes (or until the mixture begins to foam). Add flour, kosher salt, and butter. Using the dough hook attachment, mix on low speed until well combined. Then change to medium speed and knead until the dough is smooth and pulls away from the side of the bowl, approximately 5 minutes.

Remove dough from the bowl, clean the bowl, and then oil it well with vegetable oil. Return the dough to the bowl, cover with a towel, and let sit in a warm place for 50 to 55 minutes--or until the dough has doubled in size.

About 20 minutes before the end of the rising time, preheat oven to 450°F. (My oven runs a bit cool, so I set it to closer to 475°F. The pretzels won't brown well if your oven isn't hot enough.) Line two large cookie sheets with parchment paper.

Also before the end of the rising time, bring 10 cups water and baking soda to a rolling boil in a large saucepan.

When dough has finished rising, turn it out onto a slightly oiled work surface and divide into approximately 16 equal pieces. (Alton suggests 8 pieces, but I find that to be so large it's pretty much a meal in and of itself. Since I usually bring these pretzels to gatherings where other food is served, I opt for a smaller size.) Roll out each piece of dough into an 18-inch rope (estimating is fine here--no need to get out a ruler!). Make a U-shape with the dough rope, then hold the ends and cross them over each other. Press the dough ends firmly onto the bottom of the U-shape so that the pretzel will hold its shape. Or feel free to experiment with other shapes--just don't get too intricate, and it'll be fine.

You can either shape all your pretzels at once or alternate shaping them and boiling them. Or enlist child labor helpers to help shape the dough.

Place the pretzels into the boiling water, one at a time, for approximately 30 seconds. (I've gotten distracted and left pretzels in the water for far longer than this; they still turn out fine.) Remove them from the water using a slotted spoon (Alton Brown suggests a large, flat spatula for this, but I prefer my trusty spoon). Place pretzels on the lined cookie sheet, leaving 1.5" to 2" between pretzels.

Brush the top of each pretzel with the beaten egg yolk and water mixture and sprinkle with the pretzel salt. Bake until dark golden brown in color, approximately 12 to 14 minutes. (Don't chicken out and remove these from the oven too early--you want them to get fairly dark.) Transfer to a cooling rack for at least 5 minutes before serving.

*I have been known to swap in 6-8 ounces of white whole wheat flour